¶ PREPARATION OF SAMPLES AND REAGENTS
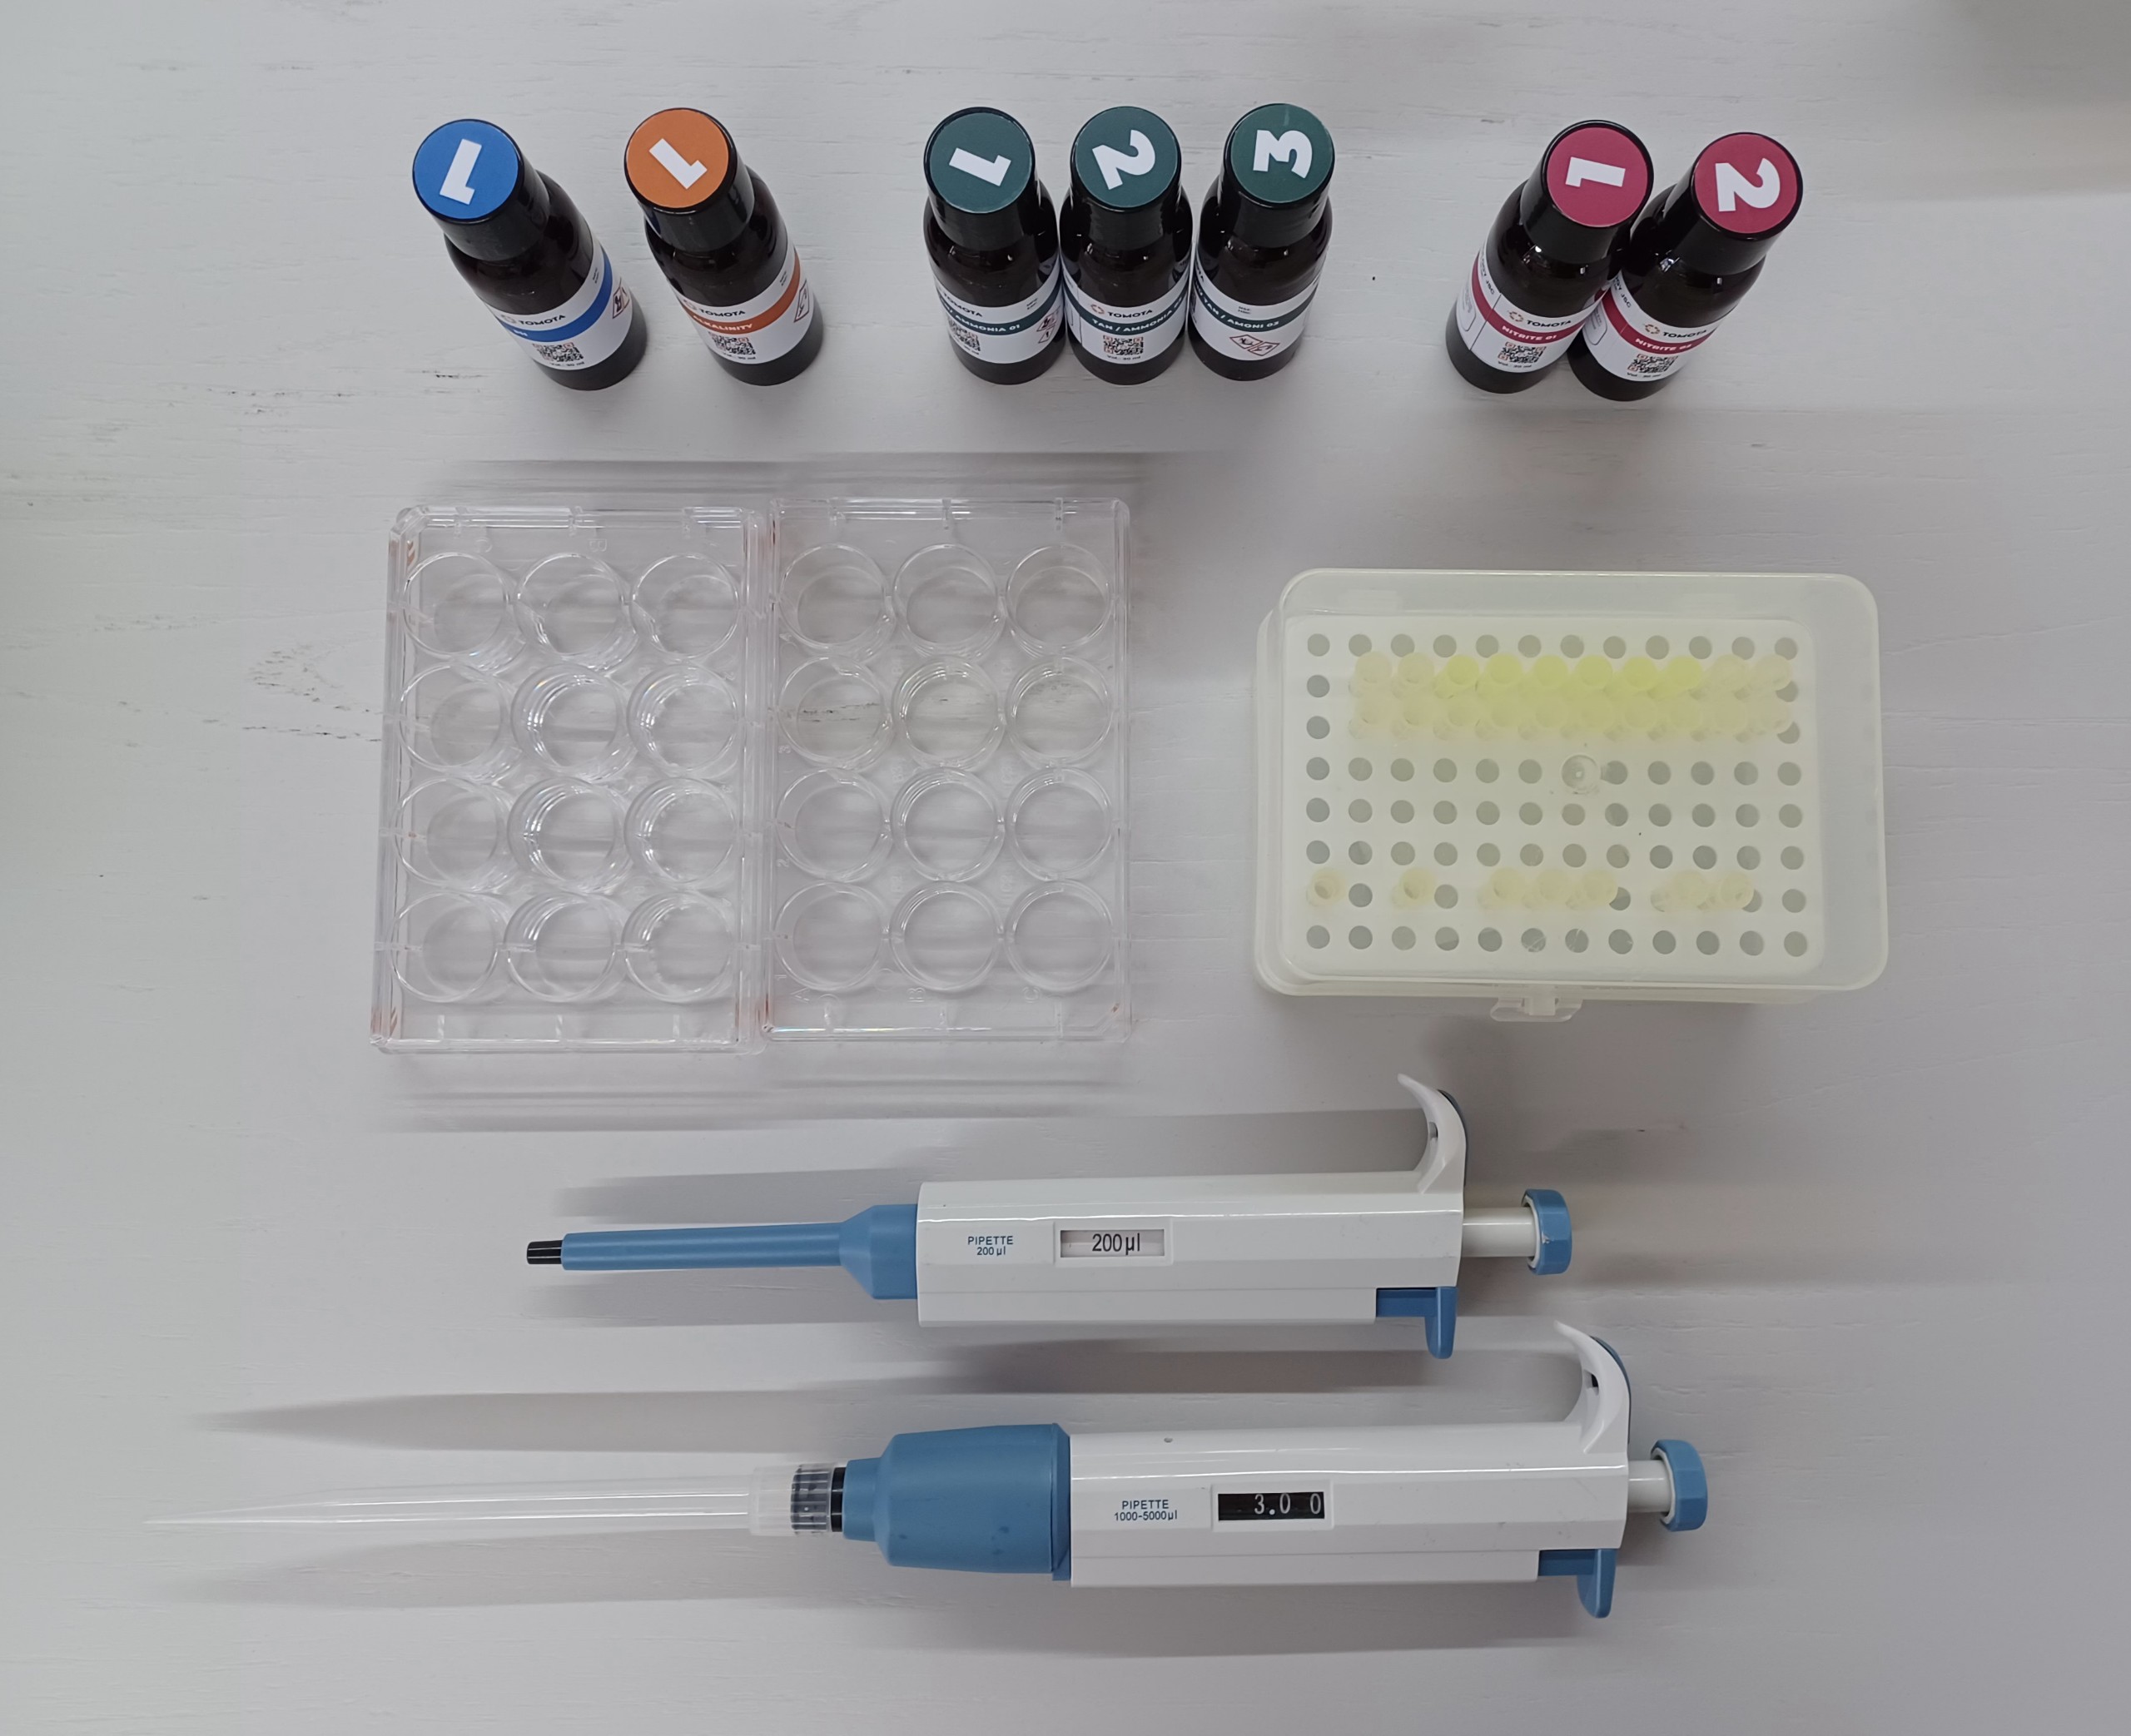
- TOMOTA A3 machine;
- Indicator 4 Parameter (pH, Alkaline, TAN, Nitrite) - 7 bottles;
- 12 well plates - 2 pcs;
- Micropipette 200μL - 1;
- Microtip volume 200μL - 7 pcs
- Micropipette 1000μL-5000μL – 1 pcs;
- Pipette Tip volume 1000μL-5000μL – 1 pcs;
- Sample of water: filtering it thoroughly through layers of fine fabric filter bags to remove impurities and suspended solids. And make sure the water sample meets the criteria:
- Turbidity range: < 100 NTU;
- Salinity range: 5-35 ppt;
- Temperature of sample: 20℃ - 30℃.
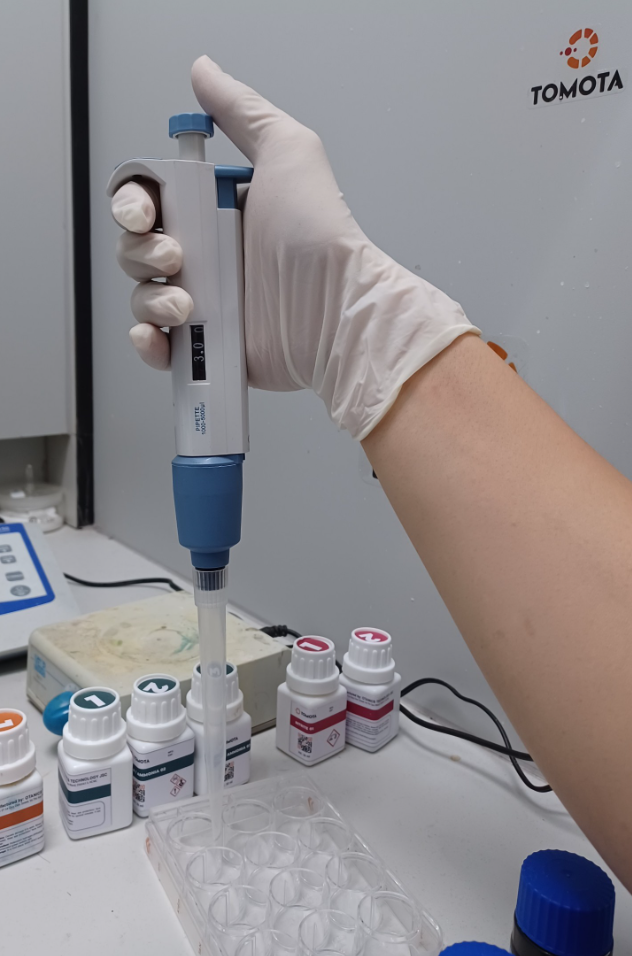
¶ VOLUME ADJUSTMENT – FOR THE MICROPIPETTE VOLUME (1000μL-5000μL)
Rotate the plunger clockwise/ anticlockwise to decrease/ increase the volume setting. A distinct click sound at every volume change ensures perfect volume setting and prevents any accidental volume change.
¶ HOW TO USE MICROPIPETTE
 |
Position 1 is where the pipette is at rest. |
 |
Position 2 (First Stop) is reached by pushing down on the plunger until resistance is met. |
 |
Position 3 (Second Stop) is reached by pushing down from position 2. |
Position 1: In this, the micropipette is at rest position.
Press fit a tip to the micropipette without directly touching the tip.
Position 2: In this, the plunger is depressed till the first stop.
To aspirate the liquid in the tip, press the plunger to the first stop. Immerse the pipette tip vertically in the liquid.
Release the plunger.
Slowly release the plunger while the tip is immersed. The liquid will be aspirated into the pipette tip.
The liquid is filled in the tip as per the preset micropipette volume.
Position 3: Depress the plunger
To dispense the liquid, place the tip on the inner wall of the receiving vessel at a steep angle.
Slowly press the plunger to the first stop to dispense the liquid.
To empty the tip completely, press the plunger to the second stop.
Wipe the tip on the inner wall while taking the tip out of the vessel.
¶ PREPARATION PROCEDURE
1. Samples are taken according to TCVN 6663-1:2011, TCVN 5999:1995;
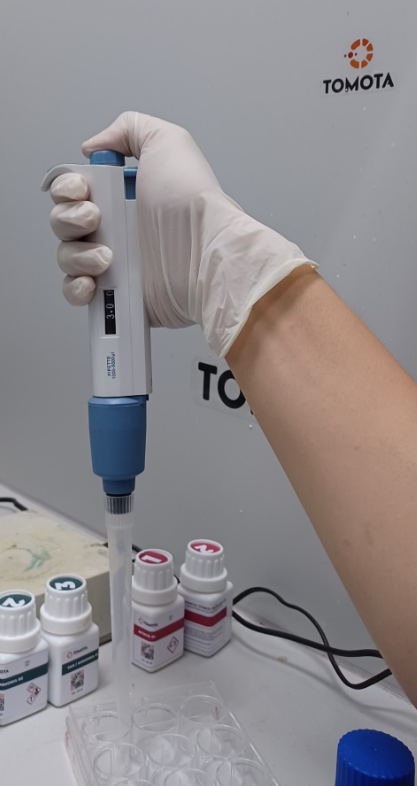
2. Take 3mL of the test sample by the micropipette volume (1000μL-5000μL), and then put it in the plate;
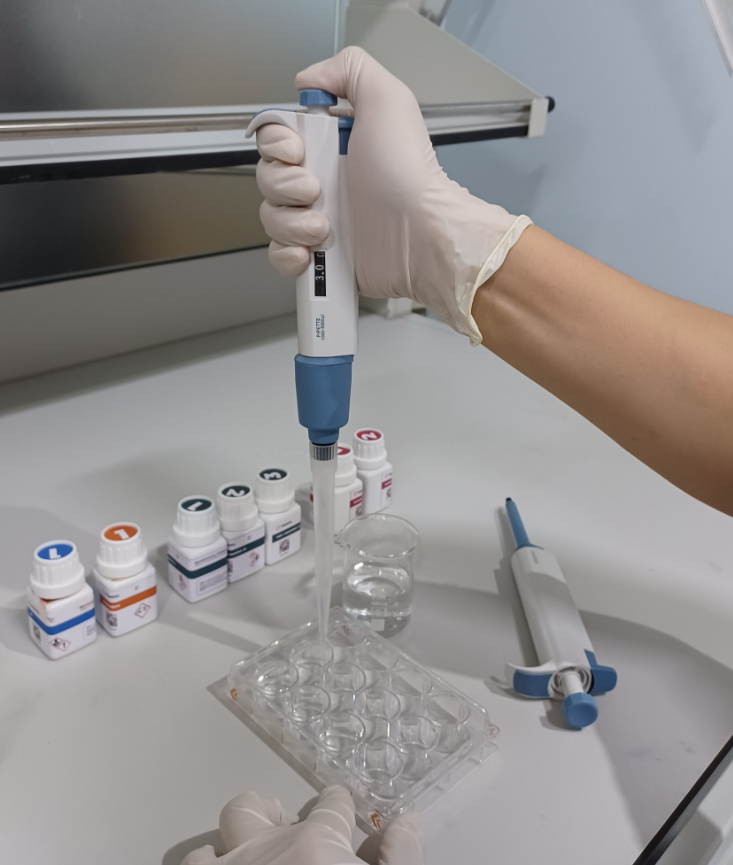
3. Add to the sample 0.2mL of the reagent by a fix volume pipette 200 μL (for each indicator, add the correct amount of reagent and volume of reagent). Shake the reagent well into the sample;
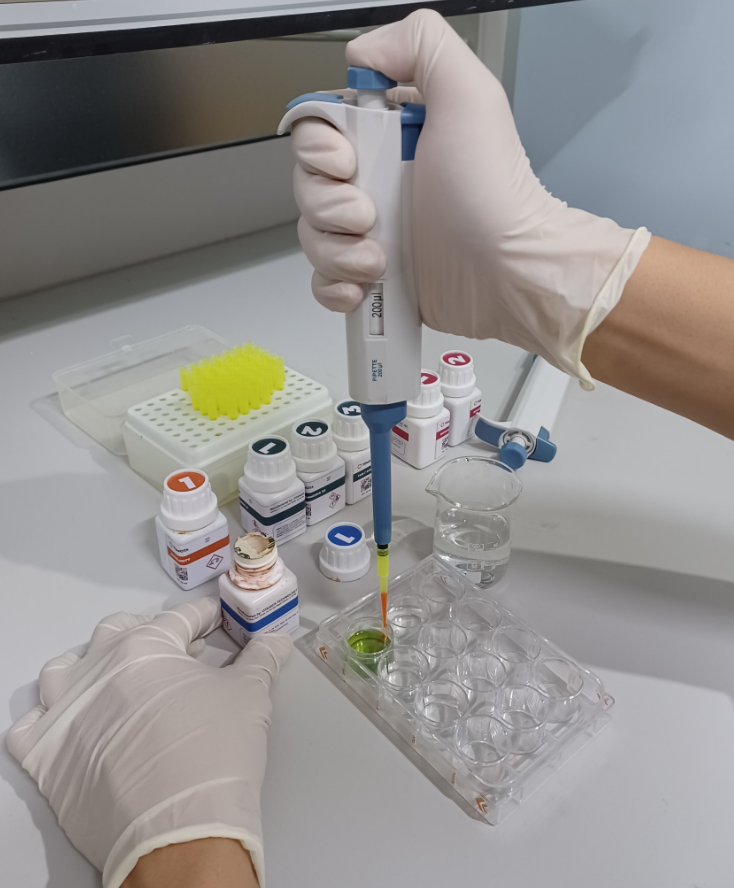
4. Place the prepared plate in the TOMOTA A3. The user switches to the operation on the machine.
¶ PREPARATION OF SAMPLE PLATE
Properly shaking the plate will increase reagent mixability as well as provide good reproducibility of the results. Shake the plate as follows:
- Line the supplied towel at the bottom of the plate. Gently shake the plate as directed below;
- To avoid spillage of reagents, it is recommended to cover the plate before shaking;
- The bottom of the plate should be cleaned with a dust-free cloth or paper before placing the plate in the capture chamber;
- Insert the plate into the capture chamber as soon as the reaction time (7 min) has ended;
- Wash the plate immediately after the measurement is complete to avoid staining from the sample;
- The reaction times mentioned in this document were taken at 25℃. Normally, it is necessary to increase the reaction time when the temperature is lower than 20℃ and decrease the reaction time when the temperature is higher than 25℃.
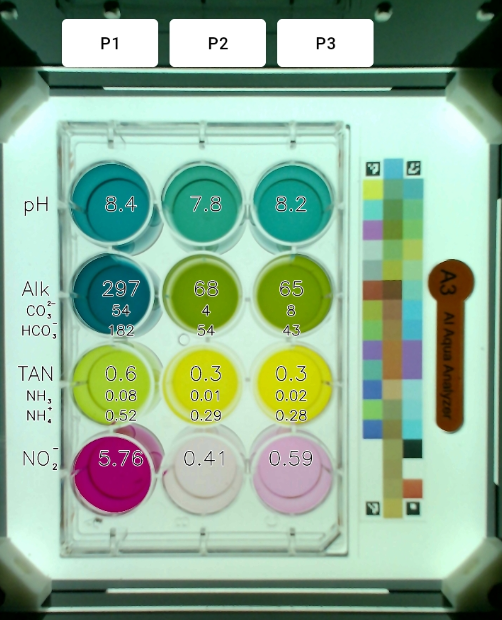
¶ PLATE DESCRIPTION
¶ OPERATION ON MACHINE
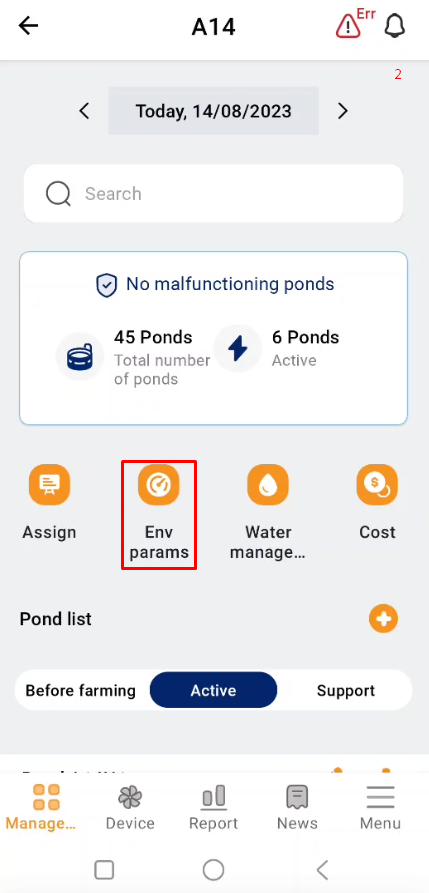
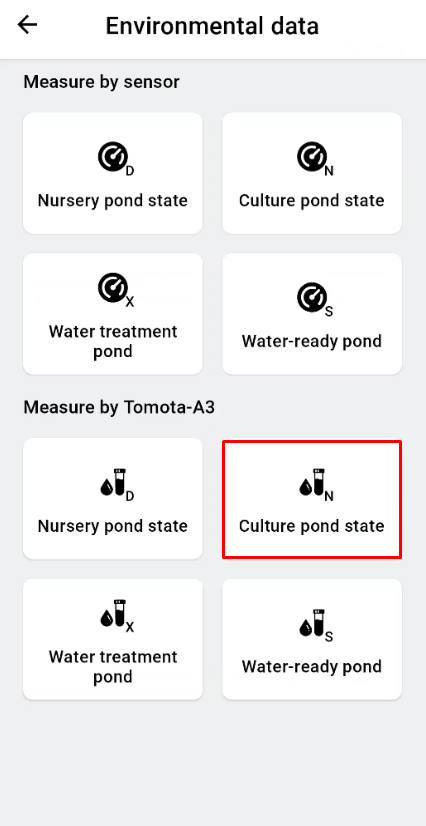
- Access the TOMOTA app on your mobile device;
- Select the “Environment parameters” section;
 |
 |
3. Choose to measure environmental parameters with the Test kit, depending on which stage the pond is in to choose the right one;
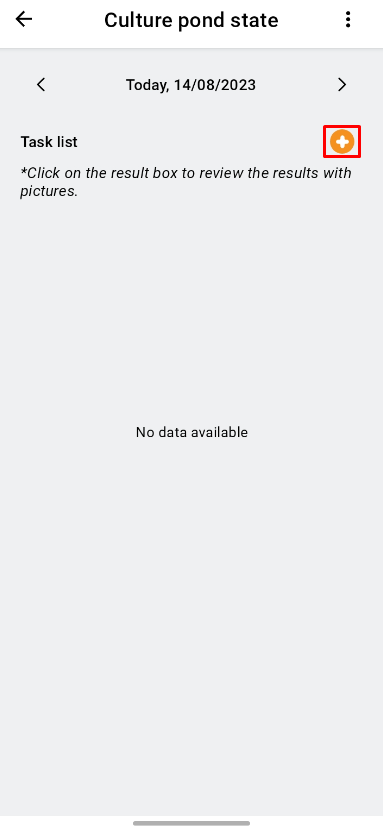
4. Click to create a measurement by clicking the “+” sign;
 |
 |
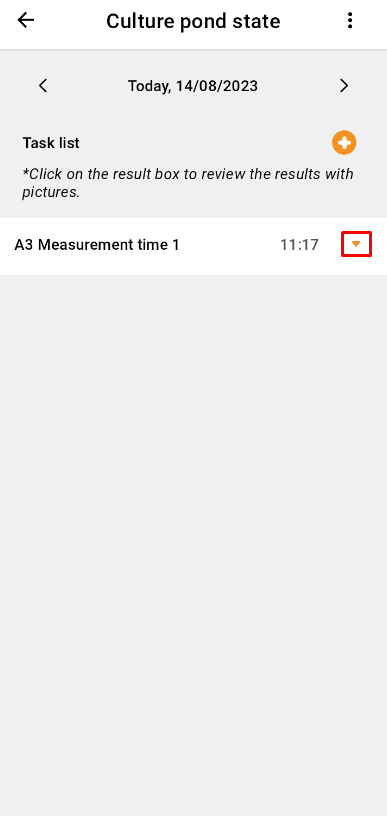
5. After creating a measurement, continue to click on the “▼” sign;
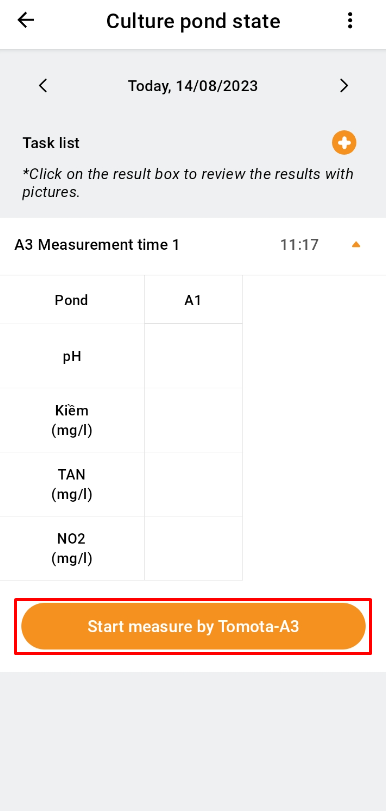
6. Click “Start measure by Tomota-A3”;
 |
 |
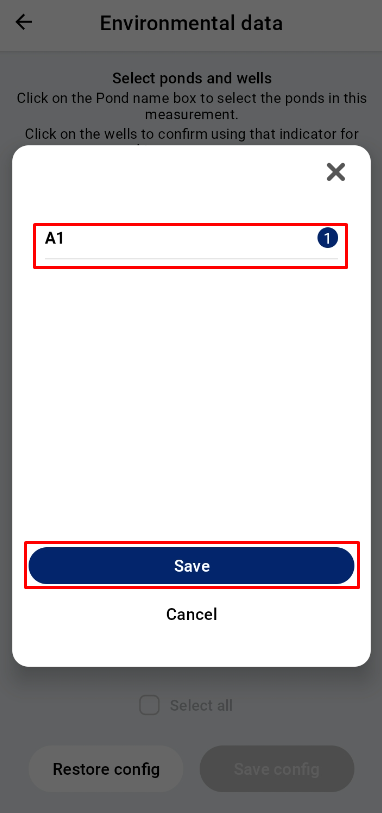
7. A new interface will open, where the user clicks on the pond to be measured with environmental parameters and selects "Save" after selecting the pond;
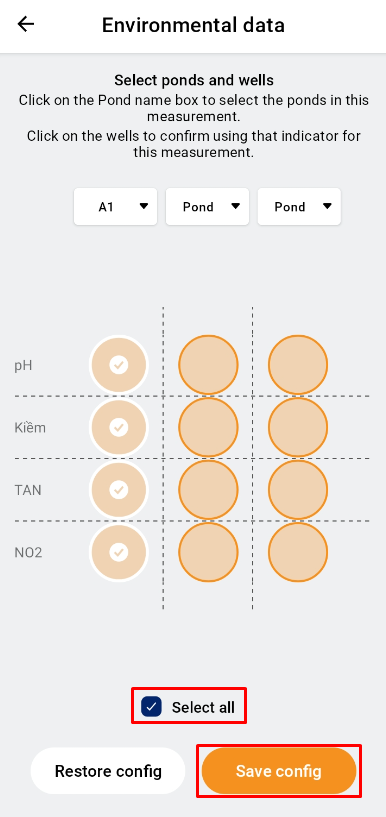
8. Users click to select each environmental parameter to be analyzed or click to select the “Select all” to measure all four parameters. To continue, the user clicks "Save config";
 |
 |
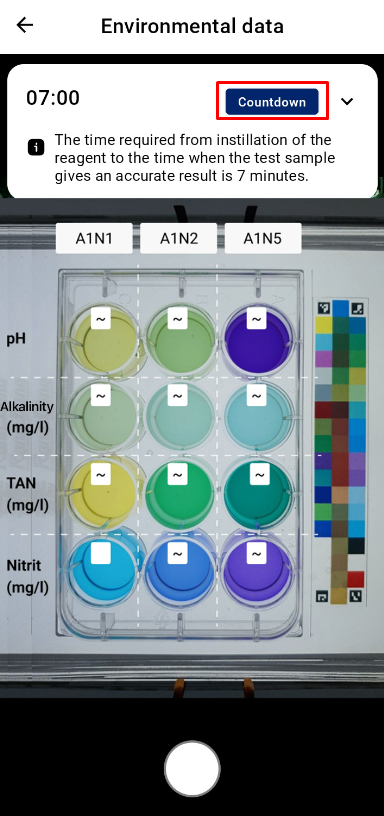
9. Take the picture by clicking the button sign or clicking “Countdown” (for measurements with TAN, Nitrite indicators). After 7 minutes, the machine will notice, the user will put the plate in position and shoot;
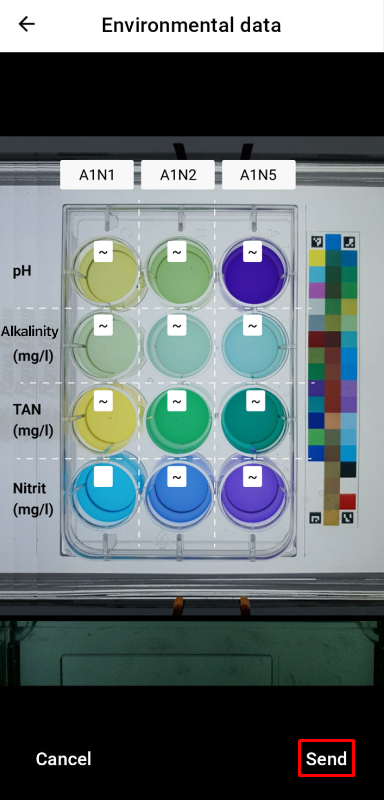
10. Users continue to click “Complete” and wait for a while to receive analysis results.
 |
 |
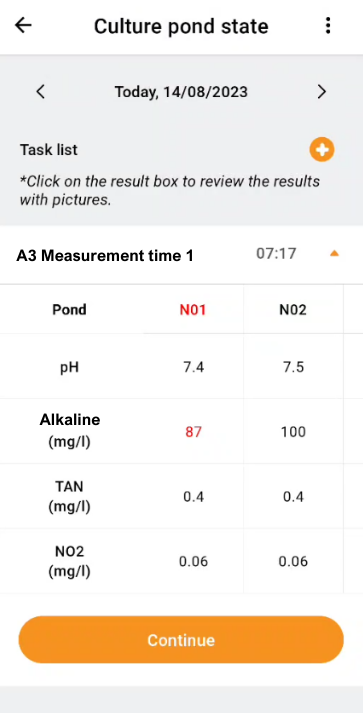
¶ TEST RESULTS
Tables and Charts will be used to display the results that were processed by Tomota A3.
 |
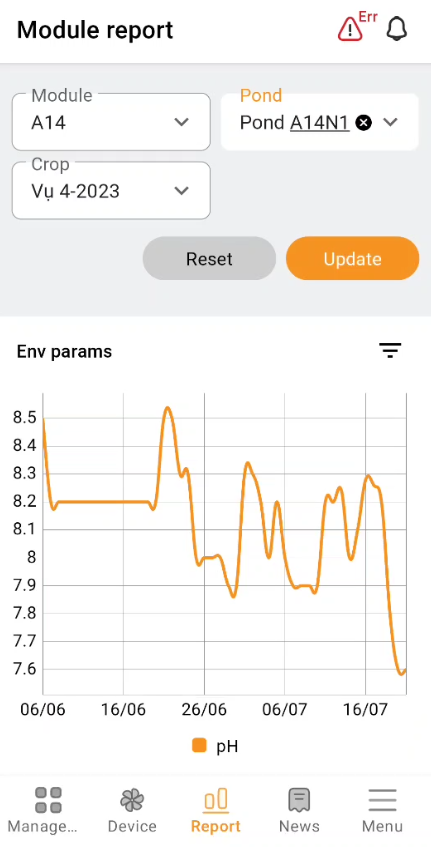 |
Combined with measuring the size of prawns, monitoring the growth curve (measured by Tomota S3) and chemical and microbiological indicators... The state of the pond will be accurately depicted by Tomota.
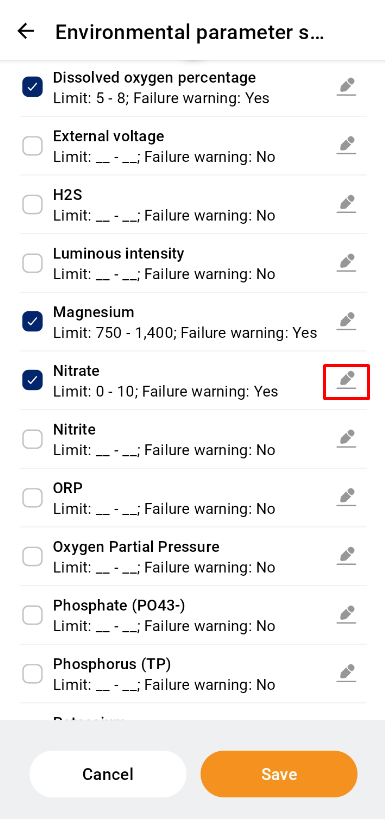
WARNING MESSAGES
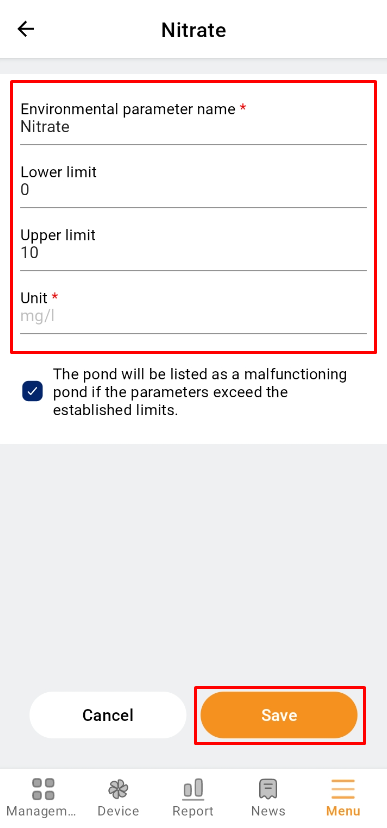
Go to “Settings”, select “Environmental parameter settings” at “FARMING STANDARDS” item.
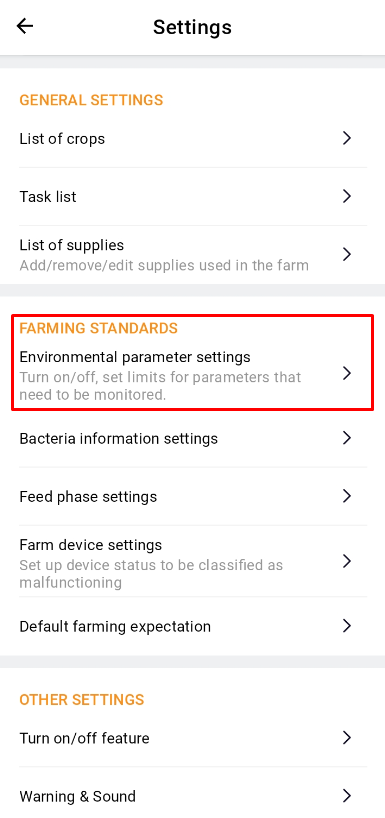
To configure the parameters, press the button on the right side of the screen. Enter the information to install, then click “Save”.
 |
 |
¶ TROUBLESHOOTING
|
Issues |
Reason |
Troubleshooting |
|---|---|---|
|
Error measurement range |
Out of range |
Support Contact |
| Value error, unexpected results |
Reduce the intensity of the light. There is residue in the sample tray. |
Check the lamp source, and replace it if necessary. Aspirate the sample to avoid dirt. |
|
Higher than expected results |
The water samples’ temperature is higher than 38℃ interfering with the indicator. |
Reanalyze the test sample at 20 - 30℃. |
|
Photo is cropped |
Place the phone/camera in the wrong shooting position. |
Place the phone/camera in the correct shooting position and re-analyze the sample. |
|
There is a dark, dirty streak at the sample plate position |
The surface of the lamp and the sample plate are dirty |
Wipe the glass shield or replace the sample plate. |
|
Color calibration bar with air bubbles, stains, discoloration |
The color calibration bar is not standard |
Clean or replace the color calibration bar. |
|
Inject the wrong sample |
Inject the test sample in the wrong position as set. |
Remove the sample from the wrong well using the syringe used to fill it with the sample and dry it with paper towels before injecting new samples. |
|
Drop the wrong reagent |
Add reagents in disorder or wrong reagents to the sample. |
Remove the sample from the wrong well using the syringe used to fill it with the sample and dry it with paper towels before injecting new samples. |
|
Photos taken are of poor quality, blurred, streaked, or wrong colors |
The camera lens is dirty; The camera connection to the phone is not good; The camera is broken. |
Use a soft cloth and paper towel to clean the camera lens. Reattach the cable connecting the camera and phone. Replace the new camera. |